The Absolute One Stop Guide to the Guitar Pedal Board
UPDATE: May 17, 2023 – A lot has changed in regards to guitar pedalboards in over a decade since I first wrote this guitar pedal board guide. This pedalboard guide was written in 2011. I will be completely updating it with all new and relevant details. I’m working on it.
Over the last decade new pedalboard manufacturers have emerged. Some of the older ones are still around and some have vanished. We now have new star pedalboard builders like my friends from Goodwood Audio and Brian Omillion from Omillion Audio. We also have LA Sound Design who’s as strong as ever and Vertex Effects amongst others.
The actual pedalboard platforms have evolved greatly. We are seeing some amazing stuff being made by Creation Music Company… which is currently my preferred platform to build on. On the extreme high end Schmidt Array has become one of the top companies. Voodoo Lab is making some awesome newer boards and bags with their Dingbat series.
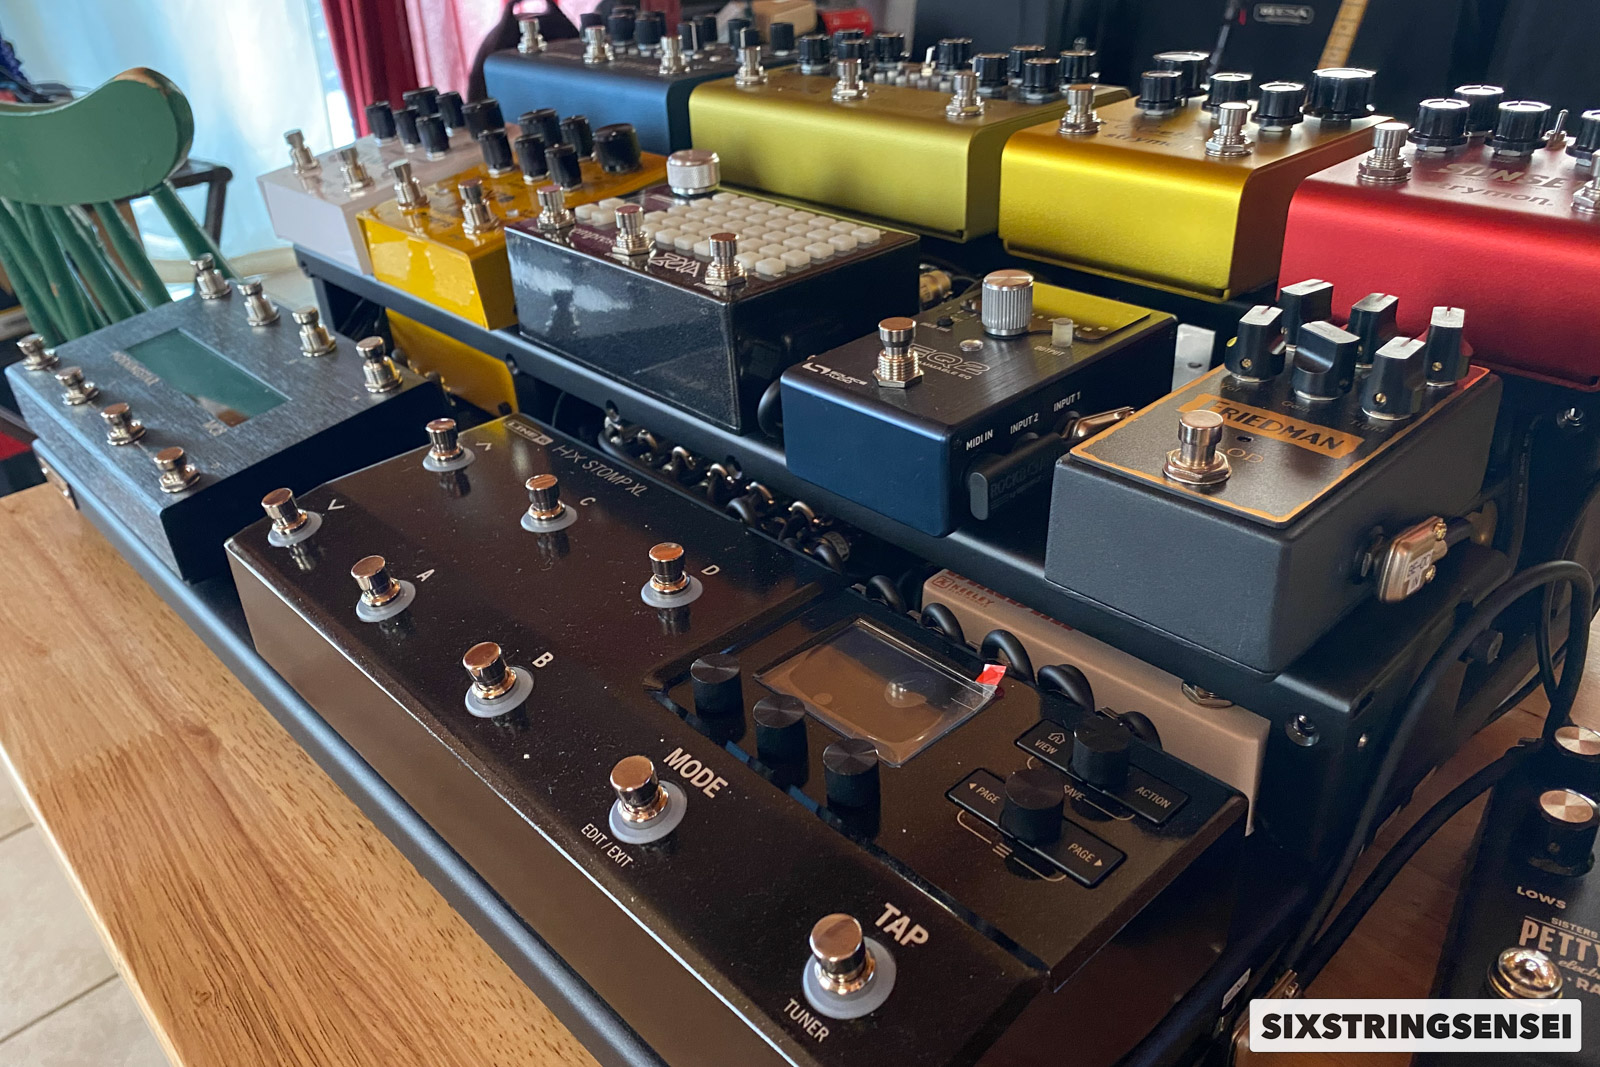
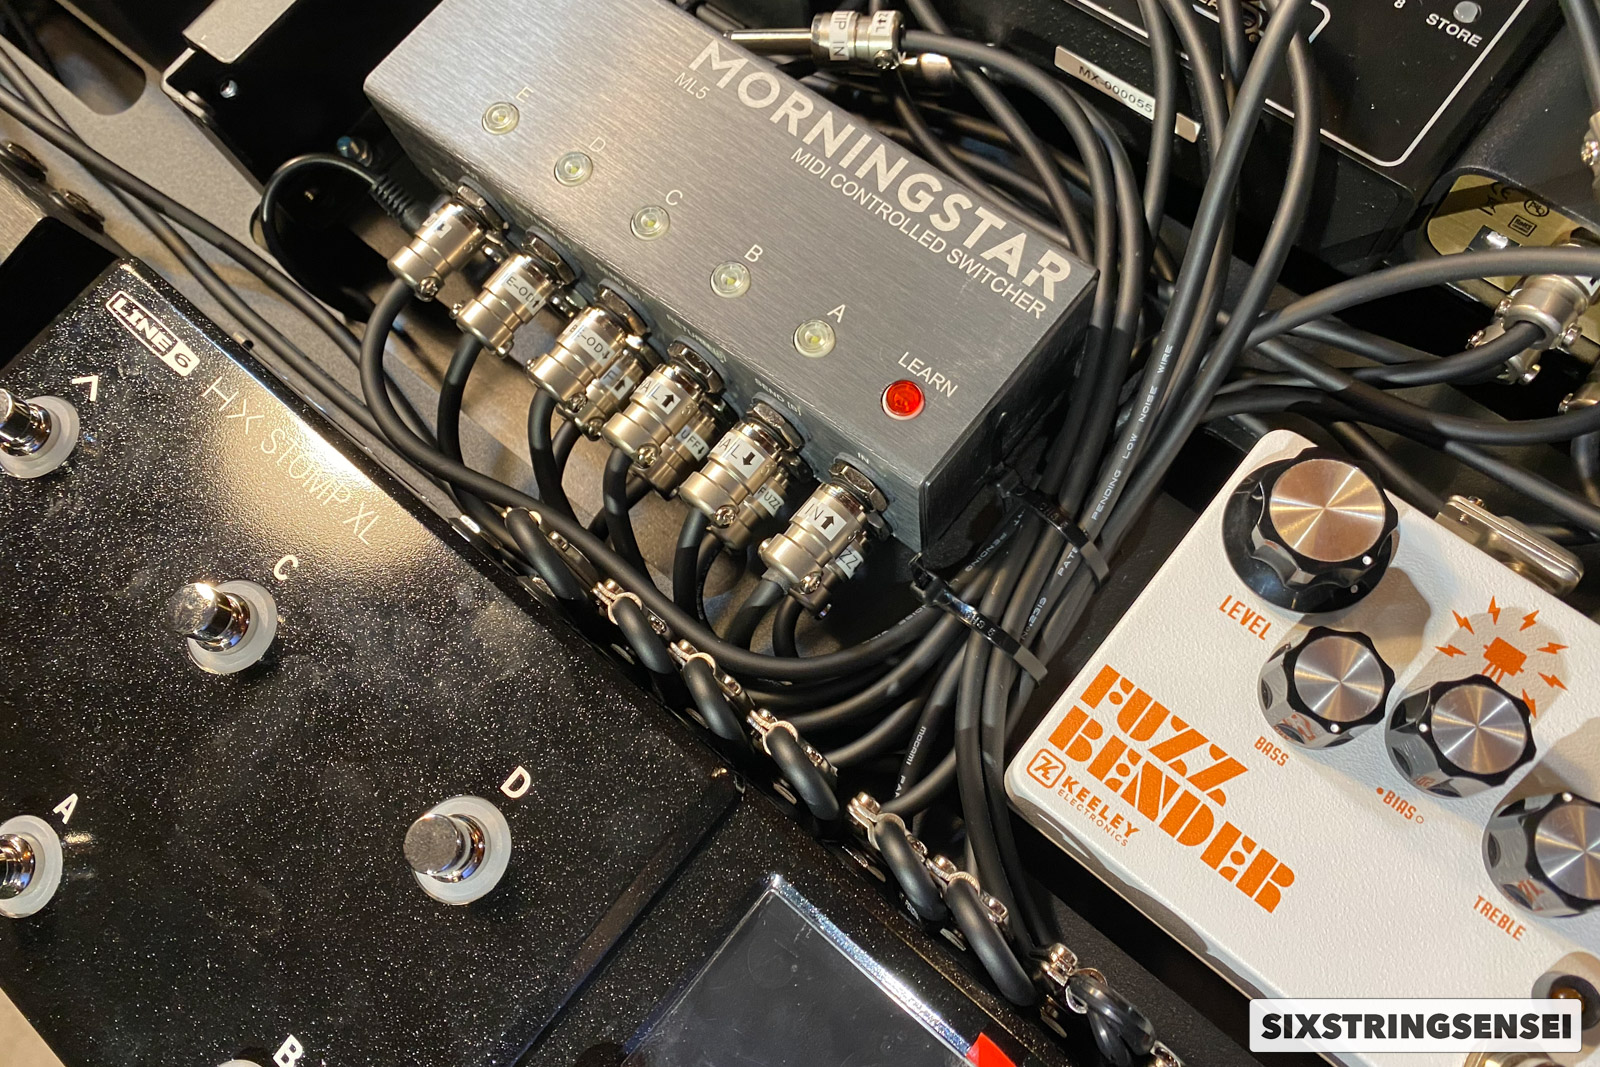
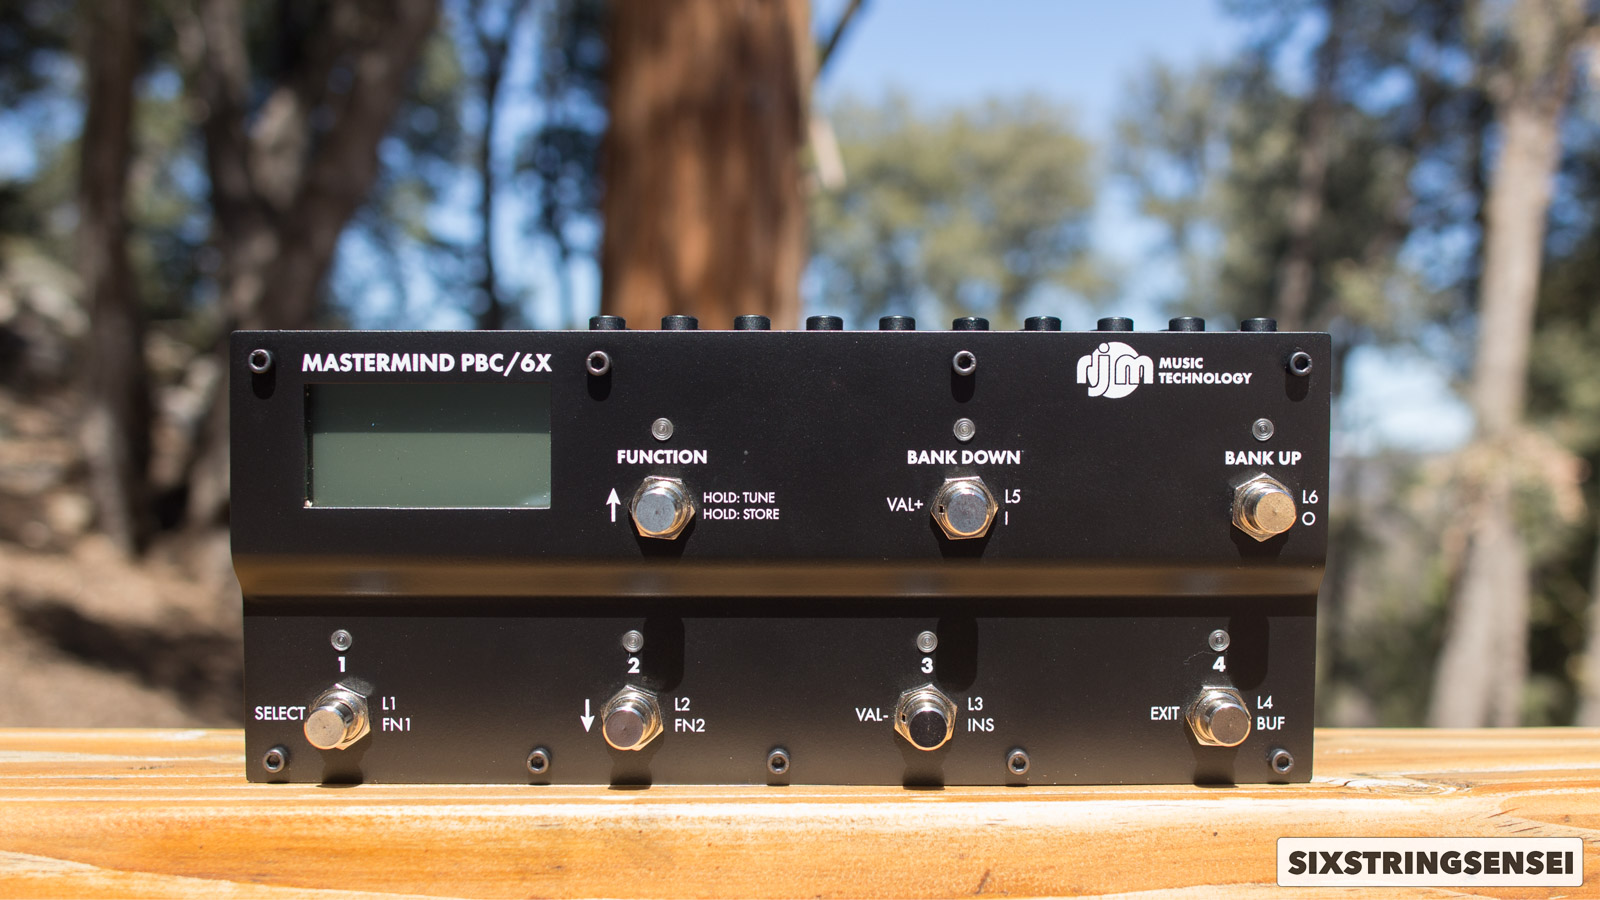
New switching systems have been created. We now also have very impressive MIDI switching and MIDI control solutions. Some of these include the PBC series by RJM Music and the MC8, MC6, MC6 Pro and MC3 by Morningstar Engineering.
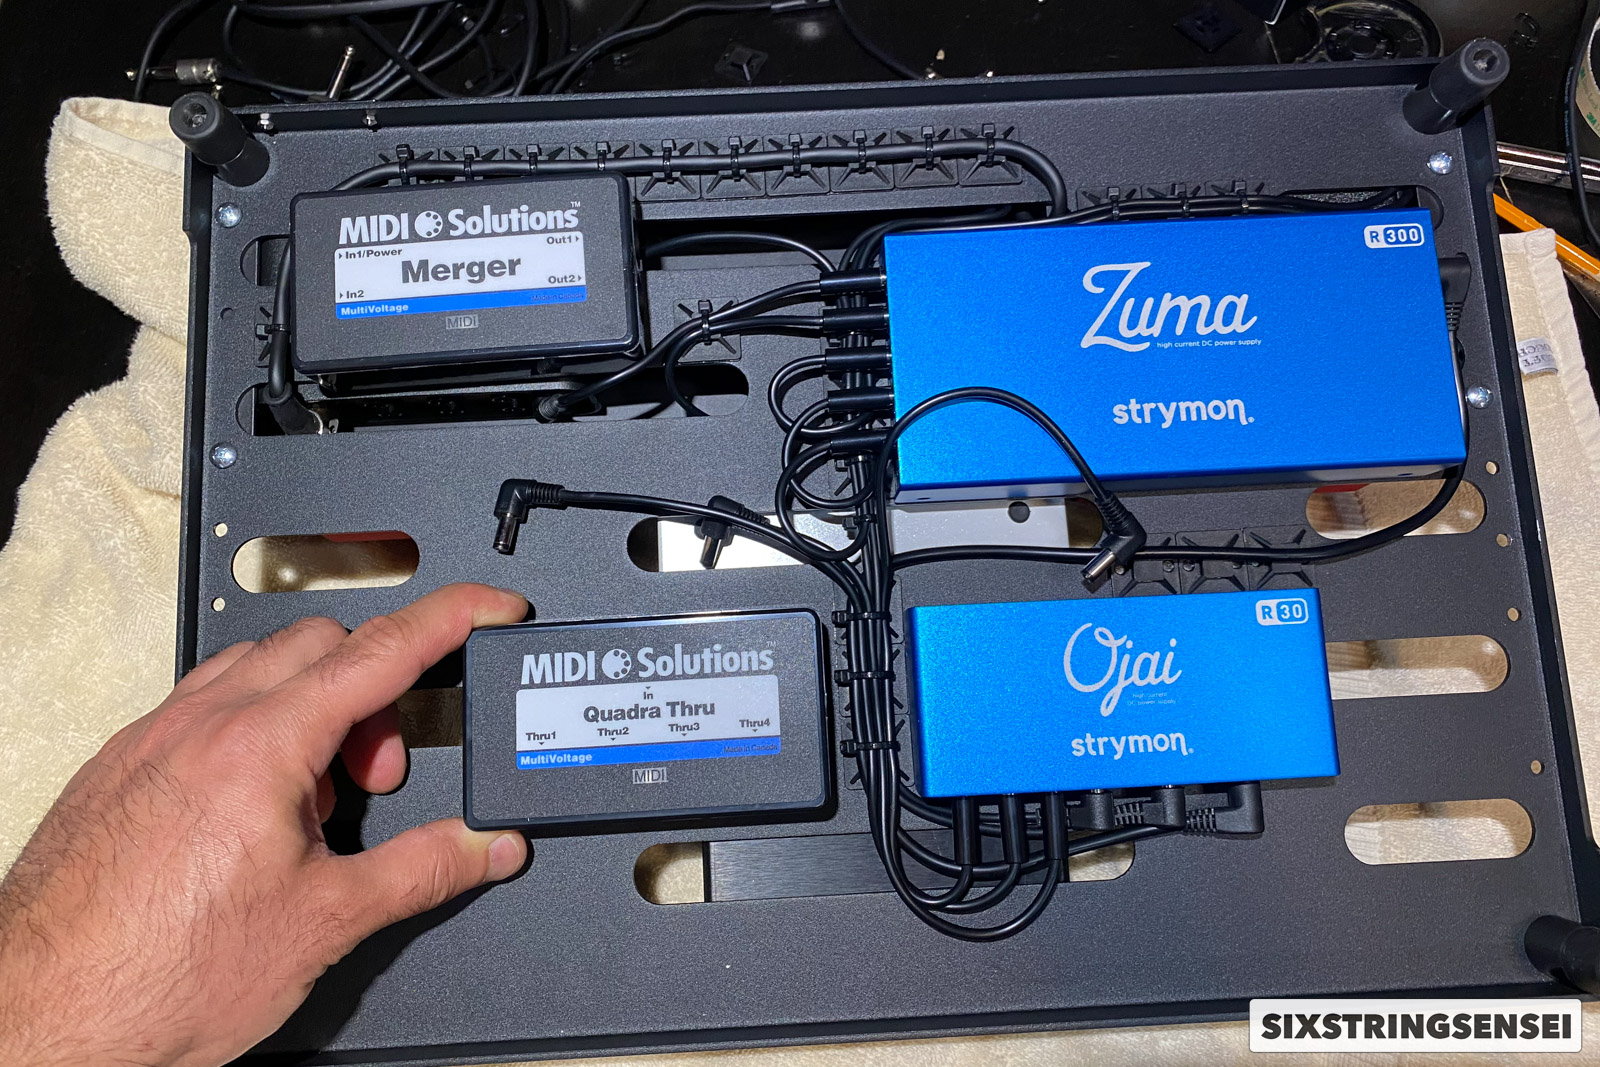
New patch cable plugs have taken over the market. The Switchcraft plugs are still great. However, we now have compact connectors like those from Squareplug. Power supplies have also evolved greatly. The ZUMA and Ojai lineup from Strymon and the ones from CIOKS are some of the top contenders these days.
Lastly, routing has made leaps over the last few years. Stereo rigs have gotten more sophisticated. Wet-Dry and Wet-Dry-Wet rigs are not more prevalent. Routing solutions for these types of guitar pedalboards now also have ways to fix phase and lift grounds to avoid hum. Looping rigs are far more sophisticated as well.
Lastly, ampless rigs and silent stages are more prevalent than ever before. Our pedalboards these days have all kinds of amp modeling solutions. Some of these include the Strymon Iridium, Line6 HX Stomp, Line6 Helix, Universal Audio amp pedals and the DSM Humboldt Electronics Simplifier. Oh, I can’t miss the Walrus Audio ACS1. That one’s really popular as well. We also have amps that include modeling solutions within that allow for direct recording or connecting directly to front of house without the needs for a cab. One example is the REVV D20.
I’m working on a full update. Stay tuned and bookmark this pedalboard guide.
Original Text from 2011 Starts Here.
Building the perfect Guitar Pedal Board is an art in itself. Just like playing guitar.
Guitar pedal boards are an essential element in the rig of countless effect loving guitarists out there. In other words, a great deal of you. Since I love gadgets so much and effects pedals are such an essential part of my love towards guitars, sixstringsensei.com would simply be incomplete without a big feature on them. So this is it! This is the big feature. What follows is purely awesome effects pedalboard info than you NEED.
Let’s start with the reason why you want that board anyway… You start playing guitar and are having a jolly good time at it. One day, you buy a tuner pedal just for the convenience of always being plugged into your tuner and being able to tune on the fly. Then you realize you want more distortion than your little Marshall wannabe-big amp can muster up, so you buy the best distortion pedal money can buy. Then you want a bit of ambiance for your solos and buy a delay pedal and a reverb pedal. Finally, one day you realize you’re good enough to play outside of your bedroom. As you are getting ready to load the stuff into your soon-to-be-touring van (or car, or bicycle) you realize, “Holy crap! What I’m a going to do with all these loose pedals?” There you have it! You need a board to put your pedals on. Not only will it make the task of traveling with them a lot easier and cleaner, but setup and tear down times at shows are greatly reduced.
Where to Start on Your Pedal Board Assembly Mission
There are 2 questions you need to ask yourself before you go about setting up a pedalboard:
- How many pedals do I have?
- How many pedals do I wanna have?
Once you figure that out, you can have a better idea of how big a board you’ll need. If you are a fan of John Petrucci, Joe Satriani, The Edge or you’re 14, you’ll likely opt for “the more the merrier” approach. If you are like me and you’re tired of lugging crap around thanks to 15 years of drumming, you might opt for less pedals. But either way, it’s what you want that matters. That’s what makes us all unique.
It’s a good idea to draw up a little sketch of your board’s layout to make sure you can fit all the pedals you want comfortably. It’s also good if you leave a little room for error just in case you screw up a measurement or you want to add a pedal or two later. A pencil sketch on a piece of paper is just fine, but you can also get as technical as me and draw a scale vector drawing to make sure it all fits. Check out one of my earlier pedal board layout designs. I created this in Adobe Illustrator® using bits and pieces from pedals of various companies.

DIY vs Hiring a Pro
Once you’ve decided on how big a board you need based on how many pedals you want, you can decide on which route to take for the actual board. You can take the DIY approach and build the thing yourself. This can be cheaper than buying one, but oftentimes costs even more depending on what you are trying to achieve. If you don’t mind if the setup looks like crap as long as it works then you can certainly save some money buy doing it yourself. If you are meticulous and want an awesome setup that looks good too it will cost a bit more and take quite a bit more time to build. Remember, for a lot of us, time is money. In other words, a $150 board bought off a music store is cheaper to many of us than a $50 DIY board that took 7 hours to build! It’s all in your priorities, but a well-done DIY project can always be well appreciated.
Below is a good platform starting point. With something like this you can DIY, but not have to build the actual platform itself — just the wiring for your pedals. Plus, this pedalboard also includes a soft case making it ideal for gigging.
Anyone who is halfway useful with a saw, hammer and screwdriver can build the platform (the board itself). If the DIY approach is not for you however, then you can have a pro pedal board builder do it for you. But, if you enlist the help of a pro pedalboard builder, you are likely doing so because you want them to do the entire job – board, pedal setup, cabling and power. This sort of job will likely run you a couple of grand depending on the size of the setup and who you hire, but the results can be astonishing. Below is a list of some professional pedal board builders:
- Black Bird Custom Pedalboards
- Casey Hanson
- Custom Audio Electronics
- DC Pedal Board
- Helweg Custom Pedalboards
- LA Sound Design
- Paul Lenders
- Pedal Racks
- Pete Cornish
- Pumaboards
- Throne
- ToneBum
- Trailer Trash


Giving the job to a professional has its pros and cons. The results you can get with a pro are sometimes mind-boggling. You see some of the stuff these guys come up with and it’s unreal! If you want the best setup in existence, hiring a pro is the way to go. These guys have so much experience building complete boards that no matter how much you prepare yourself, read, learn and how much time you put into the build, you will likely not be able to even closely match what these guys can do.
However, the downside to hiring a pro is that you lose on the rewarding experience of building the setup yourself and it can cost quite a pretty penny. For example, I’ve had little interest in chopping wood and putting together a platform for my pedalboards, so I’ve gone ahead and bought pre-made ones. My first board’s platform I bought off a company in Anaheim that is now closed, TM Cases. My second smaller board’s platform is a simple Pedaltrain Jr. Fine, the board was purchased, but the entire wiring job for both signal and power was done by me.
I love creating the connections, soldering cables, moving stuff around and putting together the whole setup myself. But that’s just me, I find the countless hours working on this to be crazy fun and rewarding. Which brings me to the point… If you don’t want to build the pedal board platform yourself, or hire a pro to do it for you, then buy the board and put together the setup yourself. Apart from some of the companies mentioned earlier that will build the whole setup or sell you the platform by itself there are number of companies that sell just the board. And just like when talking about guitars where you can mention the best guitar brands, below are the best pedal board brands (however, if I’m missing anybody please let me know and I’ll add them):
- Coffin Case
- Brady Cases
- Furman
- Gator
- Pedal Pad
- Pedaltrain
- Road Runner
- SKB
- Stompin’ Ground
- Throne
Power Up!

Now, I’m going to get into power now, because it’s so important. In fact, before you even start choosing the board, the pedals (if you don’t have them already) and other supplies, you need to consider how you will power your pedals. Since there are all kinds of pedal power requirements, this can be quite daunting. Meaning, you’ll get 9-Volt, 12V, 18V and 24V pedals, DC or AC requirements and all kind of different power draws and connection types. The choices are endless.
Sometimes there is that ONE pedal that you JUST NEED TO HAVE. Maybe that pedal is a 12 or 18 Volt pedal and you just have to find a way to power it effectively.
There are many ways you can go about this. For example, my first pedalboard had 9V, 12V and 18V pedals. I had one main power supply for the 9V pedals and 2 wall warts for the oddball pedals. When I decided to build something else, I planned ahead and for simplicity’s sake I bought only 9-Volt pedals. That way I could power them all easily using the same voltage for all of them. However, most of the time your tone requirements will not allow this. Sometimes there is that ONE pedal that you JUST NEED TO HAVE. Maybe that pedal is a 12 or 18 Volt and you just have to find a way to power it effectively. When that’s the case, you just need to live with the odd power requirements and find a viable solution.
You can go the easy, cheap route and plug a bunch of wall warts into a power strip and be done. The problem is, this looks like donkey ass, can cause all kinds of ugly noises, takes a lot of space and… did I say it looks like donkey ass? Needless to say, one of the best ways to power pedals on a board is with a dedicated multi-output port power supply. But, since most of these power supplies are designed to power 9-Volt pedals you might end up having to use 1 wall wart for the odd voltage pedal on your board. But hey, that’s better than having 3 of those ugly transformers cluttering your board. Another alternative is to have 2 pedal power supplies – one for the 9-Volt pedals and another with specialized 12 or 18 Volt output ports or possibly AC ports if needed. Plus, there are a couple of power supplies on the market such as the Voodoo Lab ISO-5 Power Supply that includes dedicated 9V, 12V and 18V outputs within the same unit. Another example is the Dunlop DC Brick, which does not feature 12V ports, but does include 18V.
Another good reason for using a proper, dedicated guitar effects pedal power supply is the regulated and isolated power. This means that each pedal is fed a steady and reliable stream of power, always at the correct voltage. Additionally, each port in the power supply is usually isolated. (NOTE: Not all dedicated power supplies with individual ports are individually isolated – check that they are before you buy). This means each of the ports works like it’s own individual power supply effectively isolating pedals from each other. This is important because it helps reduce the chance of noise, hum and static – something that plagues many cheaply made boards. Having isolated taps ensures that your pedals are not all on a common ground and problems caused by some older pedals that use bucket brigade circuits instead of more modern ICs are not amplified throughout the chain. This is the reason why daisy-chaining pedals is usually not a great idea.
Daisy-chaining pedals connects the audio and power together along the same chain which can result in ground loops which in turn causes hums and buzzes. If you mix positive and negative grounded pedals in the same chain, the problem becomes really BAD! If you have a pedal that requires a negative center and positive outer 2.1mm barrel connector (the vast majority of common 9V pedals) and another pedal that’s the other way around (center positive), putting them in isolated power supplies is the only way to go in order to avoid problems. If this is already not complicated enough, you have to keep the ground polarity of the pedal itself in mind independently of the plug polarity. For example, as mentioned, most of the common 9V pedals such as Boss and Ibanez types use center negative plugs and the ground polarity of the battery is also negative. But a lot of boutique type pedals that have the plug polarity inversed (ground positive) are also positive ground. If you mix the negative ground pedals with the positive ground pedals with a daisy chain or non-isolated power supply, you’ve got a big and expensive recipe for disaster. So I can’t stress this enough, know what the polarity is on each and every one of your pedals and feed them accordingly.
Since even dedicated 9Volt pedals oftentimes require different types of connections such as 2.1mm barrel plugs, 3.5mm mini phone plugs or even inverse polarity connections, most commercial power supplies come with various types of connectors. If you need more of a special type of connector, you can order more from the manufacturer or other online dealers that specialize in pedalboard connections. You can even make your own with individually purchased parts. Some power supplies, like the Voodoo Labs Pedal Power even come with a 9Volt battery clip to fit pedals that don’t have power supply jacks in the first place.
Speaking of the Voodoo Labs Pedal Power — Recently they updated their most popular power supply and released the Pedal Power 3 Plus. While it’s not the end all be all for all setups, for most guitarists it offers everything they need to power their guitar pedalboard. You can buy it using this link:
Apart from using the correct polarity, make sure you plug a DC power supply into a DC pedal jack. If you accidentally or unknowingly plug an AC power supply into a DC pedal jack, you can be sure your expensive pedal is going to fry! And speaking of frying, you can easily fry your power supply too. If you live in the USA and are used to plugging your power supply into a 110V main outlet, be sure to find out what the outlet voltage is in any country you are going to be traveling to. Some power supplies have built in transformers that can take a 110V or 220V feed with no problems but many do not have this feature. If you happen to plug one of these 110V power supplies into a 220V outlet, well, you probably know what’s going to happen! I’ve heard stories of such situations in more than one occasion.
Just in case you ever have problems with the power supply it’s good to always carry enough batteries for all your pedals. If something ever were to go wrong, popping a battery into each of your pedals could very well help save a show! Even if the problem is 60-cycle hum, you can usually get away with fixing the problem on the fly by unplugging a few pedals from the power supply and popping batteries into them. Rechargeable power packs such as the Sanyo Enelooop Pedal Juice are also viable alternatives. Since my pedalboard is pretty much full and every output of my power supply is being used, I sometimes will use a Pedal Juice rechargeable power supply on the side in order to add a pedal or two that I might need.
You might be wondering about the inexpensive alternatives such as One Spot power supplies that are advertised to have plenty power for all your pedals. Well, they do because they are a different type of power supply called switching power supplies, or switching transformers. The other ones we’ve been talking about are traditional transformer power supplies. There’s still a lot of debate between which is better. Both have their pros and cons, but generally a typical transformer type of power supply such as VooDoo Lab Pedal Power, BBE Supa-Charger and simple Boss PSA are safer for your gear than switching types. If something were to go wrong, the transformer types are not likely to fry your pedals with an uncontrollable surge of power. Additionally, the less expensive switching power supplies typically require that you daisy-chain pedals. By now you know that with the right combo of pedals, this works, but it’s definitely a subpar way of going about things.
Current Draw! mA
Yet another thing you have to keep in mind… Kidding right? No I’m not. This one’s really important too. That’s why if you don’t want to have to try and digest all this info you’re better off hiring a pro. But rather, don’t be a lazy-ass and learn this. It’s all very important and useful info. Ok, before I completely derail on a tangent, let’s carry on…
Voltage is one thing and current is another thing. If you feed a pedal more voltage than it’s rated for, you’ll break it. But with current it’s different. The pedals will only draw as much current as they need. So, you can have as much current on tap as you need (usually best to have more than enough to avoid straining your system) and your pedals will draw accordingly.
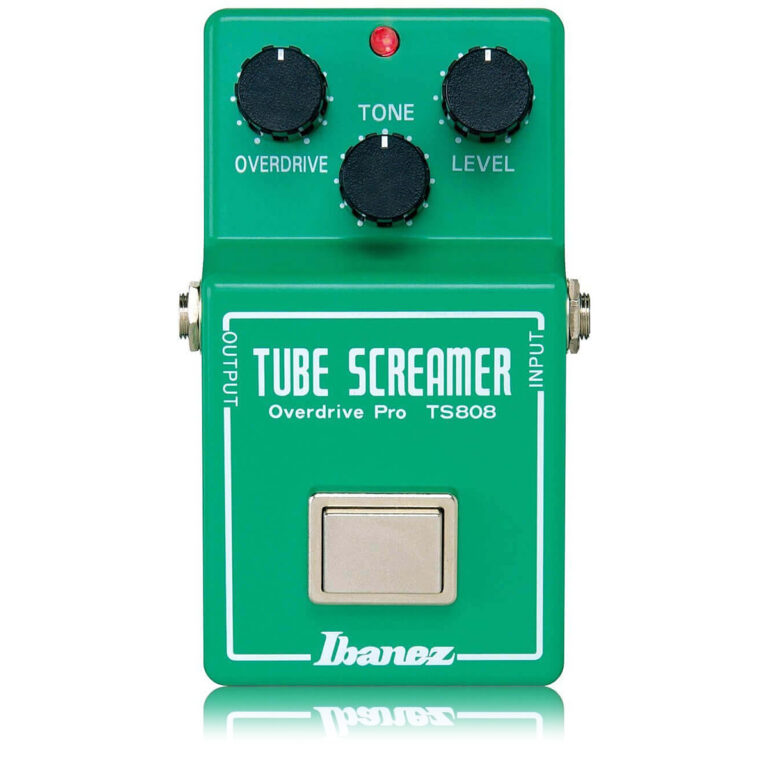
The small currents associated with guitar pedal boards are mostly always measured in milliamps (mA). 1,000 milliamps = 1 amp. When you daisy chain pedals together you have to make sure to add the current draw required by those pedals. For example, many simple analog pedals draw very little power. Most draw below 15mA. An Ibanez TS808 Tube Screamer draws about 7.5 mA and a Boss TU-2 Tuner will draw close to 40mA. As the pedals get more complex the power draw is higher. Digital pedals draw even more power. My DigiTech DL-8 Hardwire Delay/Looper draws 70mA, but some digital delays can draw upwards of 150mA. That’s the reason why a 9V battery in a simple overdrive pedal lasts so long compared to the same battery in a digital delay.
When you connect a pedal to a power supply make sure the power supply unit can in fact supply enough current to it. For example, most of the ports on the VooDoo Lab Pedal Power 2 Plus are rated to a maximum of 100mA. Make sure that the pedal you plug into one of these ports draws less than that. If you daisy chain a couple of pedals together, add up the total current draw of the pedals and make sure you are well under 100mA. If you are daisy-chaining pedals up over 100mA or need to connect a pedal that by itself draws more than 100mA, use one of the ports that is rated for higher current. In the example of the VooDoo Lab supply mentioned above, outlets 5 and 6 will do the trick at 250mA. Almost all power supplies are different so check what each has to offer before you buy and/or before you use it.
Most pedal manufacturers include the current draw specs in the pedal’s manual but not all do. Check your manual first to find what it recommends for current draw. If you can’t find it, do a web search for “pedal brand+model+current+draw” and something is bound to come up. Otherwise, you can measure the current draw of a pedal yourself.
Check out https://stinkfoot.se – Andreas has a great deal of information on there about powering effects pedals. He even has some really handy lists of popular pedals and their current draws, including a DIY feature on how to measure current draw yourself.
Linking up the Chain
There are many options for cabling your pedals together to form your chain. These cables are commonly know as patch cables. You can often buy premade cables in specific sizes such as 6 inch, 1 foot, 3 foot, etc. You can also make your own. For high quality custom boards the best way to patch your pedals together is by creating your own patch cables. The reason for this is because you can cut all your cables to the perfect length and avoid having ugly excess cable cluttering up your board. The most important thing you can do however, is BUY QUALITY shielded cables and jacks. I’m surprised every time I see a guitarist blow all kinds of money on good pedals and a nice board but then buy cheap, crapolla, patch cables to put it all together.

Now, I’m not saying go buy $100 cable – Just, don’t buy cheap junk. Good examples of guitar cables that are relatively inexpensive but sound good are George L’s and Planet Waves cable. That brings us to the debate of soldered vs. solderless since the George L and Planet Waves Cable Station cabling stuff is mostly solderless. Some claim soldered jacks and cables are the only professional solution while others believe solderless cables are just fine. That would be up to you to decide, but ask any professional electronics engineer and the answer is always going to be to solder. However, in a pinch, solderless is just fine.

Look, solderless cables are OK. I know of a lot of guitarists that have had great success with them. I for example, have not had problems with solderless cables. However, common sense tells me that putting in the extra work of soldering the jacks is just plain better. So, while I make the odd solderless patch cable here and there if I need one in a hurry, I prefer to solder all my connections. Soldering is also not a hard skill to learn. It takes some time, patience and practice, but you too can learn to solder to make your own cables. Equipment is relatively inexpensive as well. Not only that, but you’ll find the soldering skill to be very useful for many other applications beyond guitars. Trust me, it’s worth the time and effort to learn how to solder.
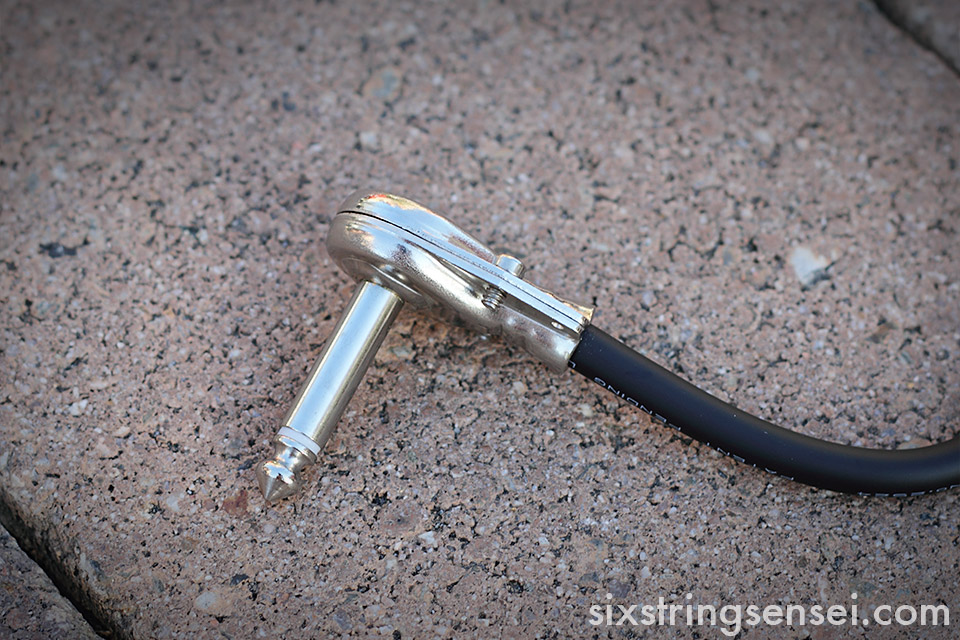
Switchcraft 228 Pancake Plugs
I’ve tried to modify both George L’s and Planet Waves cables and solder them to standard plugs but I haven’t had too much success. This is mainly due to my plug of choice: Switchcraft 228 right angle plugs (aka pancake plugs).
I love these plugs because of their low profile. They don’t extend out much so it allows for pedals to be positioned close together. In fact, on my last pedalboard build, there was no way I could have fit the amount of pedals I wanted on such a small board if it had not been for the 228 Switchcraft plugs. The downside is that the sleeve cable needs to be soldered straight to the inner chassis of the plug. Since you need to get the chassis of the plug hot enough to properly solder the cable, as soon as I got the cable hooked up, the heat would travel from the plug, right up the cable and melt the insulation! I kept having that problem even using heat-sink clips to suck up the heat right after the solder! I had this problem with both George L’s and Planet Waves cable. I must point out though, I was trying to solder solderless cable.
It wasn’t until my friend Casey Hanson shipped me over from Canada some Mogami Gold cable he had lying around. This stuff is meant to be soldered. Needless to say, I got it to work. If I wasn’t careful, I would melt the insulation too; it happened on more than one occasion. But with good care and precision I got all the patch cables made for my board. I tested them all with a multi-meter to check for continuity and I was off to the races! I must say though, that it is possible to solder George L’s and Planet Waves cable, but you need to use a plug that allows for a quick solder without having to heat up the entire plug so much. There are plenty of good plugs out there from both Switchcraft and Neutrik, so take your pick. I highly recommend the 228s for their size, but be warned, they are a PITA to solder!
 Now, when you get around to soldering audio cable there is one VERY IMPORTANT thing you must keep in mind. There is a layer of black “so-called insulation” in there between the outer (braided) and inner (signal) sleeves. I call it “so-called insulation” because this stuff is actually conductive. You MUST peel back this layer, away from the center signal section of the cable and not allow it to touch any of the center signal connections otherwise the cable will short and sound ugly. See the photo above to see how you must strip the cable – note the black section near the center – that thing is conductive.
Like I was saying earlier… Use good quality patch cables and you’ll have a good sounding rig. I had good success with Mogami Gold, but there are other good options out there such as Mogami Platinum, Monster Studio Pro 1000, Vox Class A and Zaolla Silverline Artist. Some of these are hard to find as patch cables or even by the foot, but you can always buy an actual instrument cable and chop it up into pieces to make patch cables out of it. However, this is quite expensive. But, since the cables that go from your guitar to your board and from your board to your amp are just as important, take note on buying good ones for this job too.
Attaching the Pedals
There are quite a couple of ways to attach the pedals to the board. However, after much trial and error I can say that Velcro is still the best solution. But, it’s better not to use just any ol’ Velcro. I’ve found that standard inexpensive hook and loop Velcro still allows the pedals to move quite a bit. Pedals should stay put and not move one bit. For this reason I prefer to avoid the carpeted style pedalboards altogether. I prefer straight-up powder-coated metal or varnish/painted wood. This way I can stick one side of 3M Dual Lock Velcro to the board and the other side to the bottom of the pedals. 3M Dual Lock Velcro is not hook and loop but rather hook on both sides and goes together super tight. The connection of Dual Lock is so strong that you can sometimes pick up the entire board by one pedal.
Traveling with Your Pedalboard
Earlier in the feature I mention that building a pedal board will make traveling to and from gigs easier. Obviously that’s because your pedals are always perfectly set up and connected on the board. But, you’ll need some way to protect them when in the van. If your gigs are around town and you don’t pile up your gear in the back of your truck to make it look like a train wreck, a soft lightweight case is usually just fine. If you will be traveling further, flying or your gear is simply more prone to getting damaged, then a hard case or ATA case if probably a better option. Most of the pedalboard manufacturers listed in this column either make a case for their supplied boards or they can point you to someone who does. Because of the inherent similarities I’d like to point you to this feature on guitar cases so you can learn more on the subject.
To Conclude
There are 2 hugely important topics related to building a guitar pedal board. Links to those features are below. Make sure to read those as well as they are important keys to your success when setting up your pedal board.
Frankly however, I’m applaud you for making it this far. This has been a long feature. Please Join our email list.
Where to Buy
After reading the guide, many readers have been emailing me about where to buy a pedalboard. Lately, I’ve been buying more and more on Amazon thanks to the convenience of being able to buy everything from one place. After getting this far you’ve probably noticed I’ve sprinkled links here and there to some of the products mentioned in the article. If you buy through any of those links you help give back a little for the work put into this feature as I get a small commission. Thanks for that.
More Coming. Guitar Pedal Board MIDI Switchers

+1-ed, my friend! Awesome and much-needed invention! Hope you and the fam are well!
– Brent
Thank you, this has been great in helping me set up my board.
Chris
Great content. Keep putting quality info out there for us musicians.
Custom wiring very important for pedal board setup. We would like to recommend a few wiring techniques we use: https://youtu.be/eBC796iArL4 and https://youtu.be/XoONnrGpKxs
Thanks Danny for a great article!
@bulletcable Pretty cool patch cable videos guys. I’m a fan of soldered plugs, but these look to be quite good.
A nice as this pedalboard is, keep in mind one thing. The guy who he built it for probably doesn’t have to hump it for the gigs. He has roadies. That thing looks really heavy, especially once you add about 10 pedals to it, including wah wah and power supply and flight case. The only advantage to buying the pedaltrain would be the weight issue. That’s my only issue with custom cases. They haven’t figure out a way to make them lighweight. Thanks, @Marisha
******************************************************************************
You’ll get quality AC/DC adapter here: https://www.dchub.co.uk
Wow that`s a lot of good info.Doing my research before I build my own pedal board.Any info about Popping noises and the causes ?
I have an auto wah pedal which is great (best i`ve ever heard infact ) but when used with a reverb pedal straight after it ,it causes the reverb pedal to make a loud pop noise when it is engaged.Whenever I use the reverb pedal with any other pedal it does no such thing .
Hey man!
Really nice job.I want to ask about he cable clamps/ties you’re using underneath the pedaltrain.Where can i find those?
Hi, thanks. I got all that stuff at Fry’s. If there’s none near you, you can always order online.