Reading Scale and Chords Diagrams
Throughout this site you will encounter various diagrams that will show you a visual representation of what you will learn to play. These diagrams are slightly customized for my lessons, but they are very similar to what most books and teachers use as a standard. Most authors don’t go through all the trouble of identifying fifth notes and other details that I include in my diagrams. So consider these pretty complete. Also, once you understand them you’ll pretty much be able to read every half-decent diagram that you may find in any random book. Nice, Eh?
Take a look at the examples below:
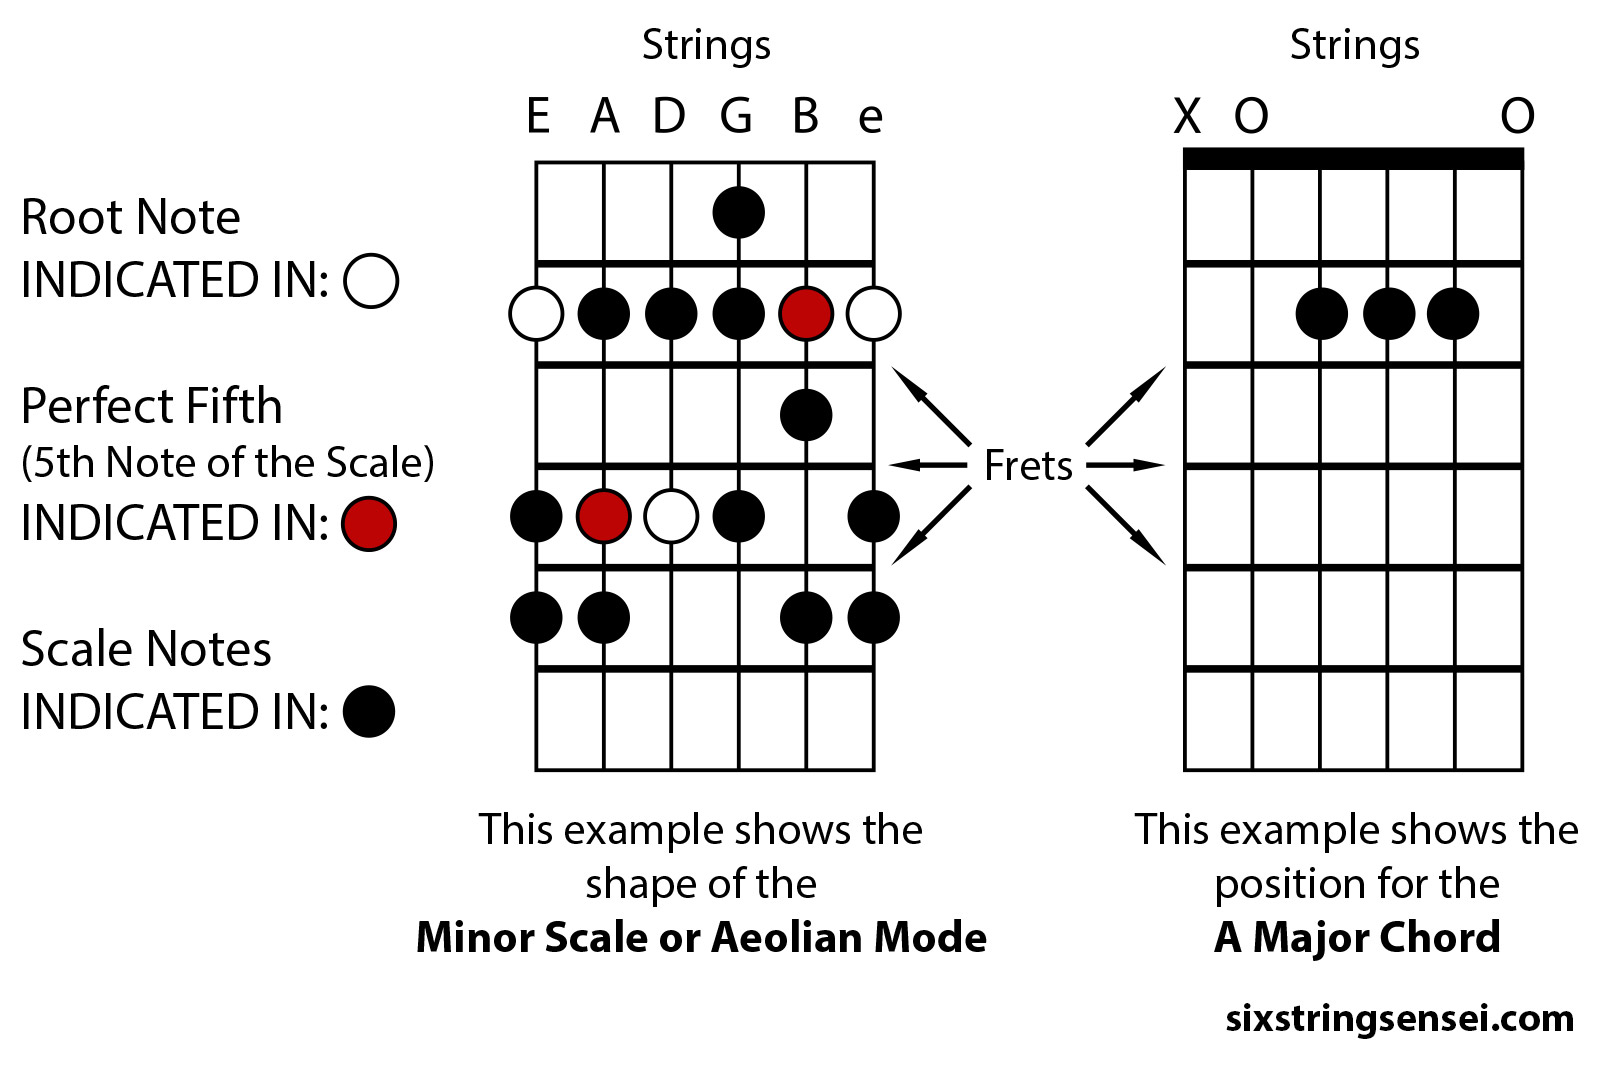
First of all, make sure you understand the top of the diagram is the end that points towards the headstock of the guitar. The bottom, well, points to the body. Straight-forward. So, each of the vertical lines represents a string and each of the horizontal lines represents a fret. The thick horizontal line at the top of the chord diagram represents the nut.
The Scale diagram starts of at the “Root Note” which is the first note of the bottom “E” string. Please note that the bottom “E” string is the last one from the floor up. So don’t think of the top and bottom as the position they look visually but by their tone. The thickest string, the one closest to your chest when you hold the guitar, the one that’s the highest off the floor, THAT is your bottom “E” string. So the one closest to the floor, the thinnest one, is the high “e” string. Having said that, never forget, when you go “up” the neck you actually go towards the body of the guitar. When you go “down” the neck you actually move towards the headstock. Don’t forget this.
The notes of the scale go in tone order from low to high. In the example above, after the third note of the scale you go to the following (fourth note) of the scale which is on the “A” string. The following note will be the “Fifth” note of the scale (That’s the one identified in red). You should pay special attention to the root and fifth notes in any scale. Not only are they very popular “intervals” (more on those later) but identifying their position will help find your way all over the fretboard. Plus, Fifth’s are the basis of powerchords, and they fill a very important role when transposing (switching) keys.
The chord diagram not only has the indication of the nut, but it also has those funky-looking X’s and O’s atop. Well, simple. When you play the chord in the diagram, do not strum the any strings marked with the X. The O’s mark strings that sound “open” (not fretted anywhere) and the strings that have no marks are those that are fretted.
The diagrams may look like rocket science but they are actually pretty simple to understand. Take a look at the diagram below:

The main difference with this one is that it’s horizontal instead of vertical like the previous ones. This kind of diagram is used mainly to illustrate complete keys throughout the fretboard. Notice that each side of the diagram remains open. This suggests that the key can be moved up or down the neck to suit any key. Since this diagram is a representation of the shapes of the the whole key and how all the modes (more on those later) are tied together it is not specifying any given key. That is why I don’t specify on which fret it begins. By the way, notice how many Root Notes (white dots) and how many Fifth Notes (red dots) can be found throughout the fret board. Please, don’t try to understand all this now. I just want you to start getting your feet wet so you can have glimpse. It’s not time to jump in the ocean just yet!